Where to start with dsh? DeepSeek Harness setup in 4 steps
Getting started with dsh takes four steps: get the app running → configure a model provider → install plugins → keep it updated. The order matters; skipping ahead produces fake failures like "the page opens but nothing works." This guide states the done criteria for each step and ends with a map from symptom to guide.
DeepSeek Harness setup overview
DeepSeek Harness (the dsh CLI) is DeepSeek AI's open-source agent framework, launched with one command and extended through DSH plugins. So onboarding splits naturally in two halves: get the framework running, then add capabilities (source). Finish all four steps and you have an environment you can chat in, extend with plugins, and update:
- Get the app running:
npx @deepseek-ai/dsh web; - Configure a model provider: connect a model in the Web UI settings;
- Install plugins: one-click install from the Hub market;
- Stay updated: two separate command sets for the app and for plugins.
Step 1: get dsh running with npx
Step one has a single prerequisite — Node.js on your machine; after that, one command starts it. The official Quickstart path is to bring up the Web UI first, and the command prints the address to open (source).
- Run
node -vin a terminal. Expect: a version number such asv20.11.0. If nothing comes back, install the LTS package from the Node.js site and reopen the terminal; - Run the start command:
npx @deepseek-ai/dsh web
Expect: the first run downloads the @deepseek-ai/dsh package and initializes the web profile, then prints that the server is up (download time depends on your network);
3. Open http://127.0.0.1:3080 in a browser. Expect: the DeepSeek Harness Web UI. On a local start it usually opens the browser for you; add --no-open if you don't want that. Keep the terminal window open — closing it stops the server.
If you'd rather type dsh directly in the terminal, install it globally with npm install -g @deepseek-ai/dsh. The trade-offs between the two are covered in What npx @deepseek-ai/dsh web actually does, and where your data lives.
Step 2: configure a DeepSeek Harness model provider, or chat won't work
dsh itself is only a launcher — model access must be configured as a provider, and until it is, the page opens but messages go nowhere. In the official Web UI first-run flow, configuring a model provider is the prerequisite for starting a conversation (source).
- Open Settings in the Web UI and find the model / provider section. Expect: a provider list and an API key field;
- Enter your DeepSeek API key (or connect a local model as a custom provider). Expect: the provider status switches to available once saved;
- Go back to the session and send a test message. Expect: a model reply. On an error, check the key and network as the message suggests.
Where those settings live, and how to edit settings.yaml and the credential file, is covered in Where is the dsh config file? Settings.yaml and $DSH_HOME.
Step 3: install your first DSH plugin from the market
Once chat works, capabilities come from plugins — and the visual market beats hand-typing dsh plugin. The community-official DSH Plugin Hub installs into your own DSH environment, under Settings → Plugin Market (source):
- Install the Hub first:
dsh plugin --profile web add dsh-plugin. Expect: the install completes, and after restartingdsh weba Plugin Market entry appears in Settings; - Open Settings → Plugin Market. Expect: a list of plugin cards, each showing name, version, category, verified badge, stars and last update;
- Search or pick a plugin by category and click Install. Expect: a confirmation dialog first, showing the plugin name, source repository and the command about to run; after confirming, installation starts with visible progress;
- Check the Installed list afterwards. Expect: the plugin shows up there, ready to update or uninstall in one click.
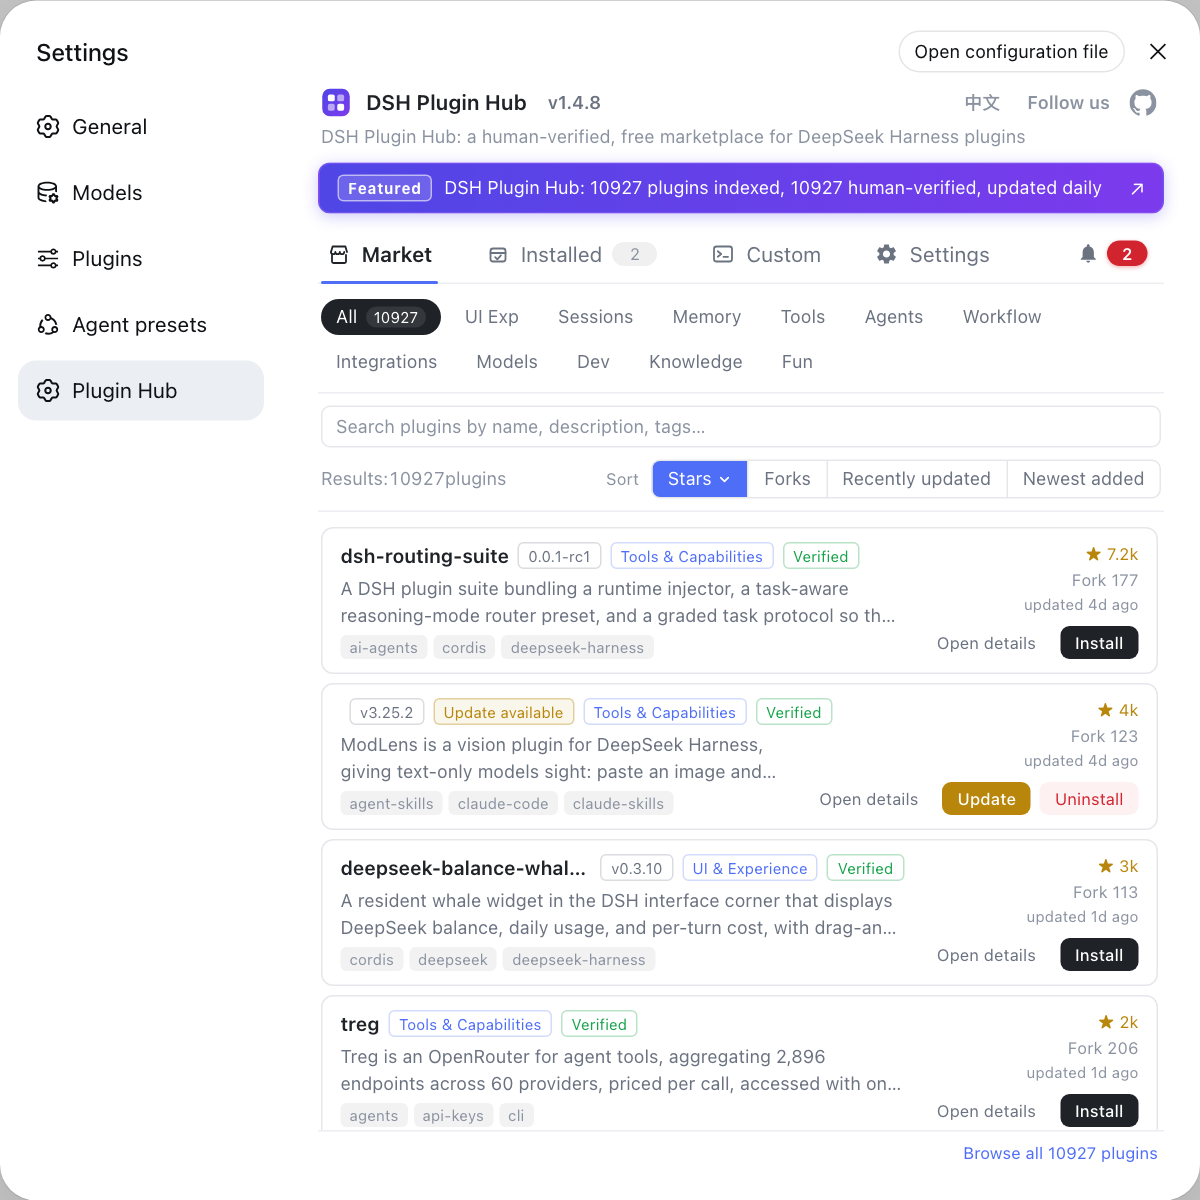
Instead of memorizing dsh plugin arguments in the terminal, manage plugins through the DSH Plugin Hub UI — search, install, update and uninstall all come with confirmation and progress feedback. Visit https://dsh-plugin.org/ to learn more.
Step 4: update the dsh app and DSH plugins separately
There are two separate update paths and they don't affect each other: the app follows how you installed it, plugins use dsh plugin update. Naming the target before acting prevents the classic mix-up of updating the app and assuming the plugins came along (source).
- Check the current version: for a global install run
dsh --version. Expect: a version number; it prints the launcher version only before the argument boundary; - Update the app: with npx, just re-run
npx @deepseek-ai/dsh webfor the latest build; for a global install runnpm update -g @deepseek-ai/dsh; for a source checkout rungit pullin the repo and rebuild; - Update one plugin:
dsh plugin --profile web update <package>. Expect: only that plugin updates; without a package name it updates every dependency in the profile; - Verify after updating: the Web UI opens into a session normally and the target plugin shows its new version in the installed list.
Full version pinning, rollback and failure fallbacks are covered in How to update dsh to the latest version, three ways.
When dsh gets stuck, look up the symptom instead of reinstalling
Almost nothing a beginner hits means the app is broken; match the symptom to the right layer. Each symptom below maps to its own troubleshooting entry (source).
- Startup hangs with no download progress → What to do when the dsh install hangs;
- The page won't open or access is refused → 127.0.0.1:3080 unreachable, access refused;
- The model won't connect or the key errors out → DeepSeek Harness model connection;
- A plugin installs but does nothing, or fails to load → What to do when a DeepSeek Harness plugin won't load;
- No Plugin Market entry in Settings → most likely the Hub isn't installed or hasn't taken effect; reinstall with
dsh plugin --profile web add dsh-plugin, restartdsh weband refresh.
Your data lives in $DSH_HOME (~/.dsh by default) regardless of install method — reinstalling the program never loses your config or sessions, so there's no need to uninstall and start over while troubleshooting.
Sources: deepseek-ai/deepseek-harness, DeepSeek Harness Docs - Quickstart, dsh CLI README
FAQ
The order for DeepSeek Harness is: get the app running, configure a model provider, install plugins, then keep it updated. Start the Web UI with npx @deepseek-ai/dsh web and open http://127.0.0.1:3080; set up a provider in Settings (a DeepSeek API key or a local model); install DSH Plugin Hub and add plugins from the market; finally stay on the latest version via npx. Skipping any one of the four leaves you stuck.
Nine times out of ten it's step two — DeepSeek Harness has no model provider configured yet. dsh itself is only a launcher — model access comes from configuration, so without a provider the page opens but chat is unusable. Fill in your DeepSeek API key in the Web UI settings, or wire up a local model as a custom provider, then send a test message to confirm you get a reply.
Because DeepSeek Harness is built on an "everything is a plugin" architecture: models, tools, UI and skills all plug in as DSH plugins, and the core hardcodes no capabilities. Getting the app running only gives you the framework — new capabilities come from plugins, and the easiest entry point is DSH Plugin Hub under Settings → Plugin Market.
First separate the app from DSH plugins: features and UI changes follow the app, so re-pull the latest package with npx @deepseek-ai/dsh web, or use npm update -g @deepseek-ai/dsh for a global install; if one plugin misbehaves or needs a newer version, run dsh plugin --profile web update <package>. The two are independent — updating the app never touches your plugins.
The three most common DeepSeek Harness blockers are startup, connectivity and plugins. If startup hangs, read the install and stuck-install troubleshooting; if the page won't open, it's usually the port 3080 or access-restriction issue; if the model won't connect, read the model connection and API key guide; if a plugin installs but does nothing, read the plugin-not-loading troubleshooting. Match the symptom instead of reinstalling the app.
Related Terms
- dsh
- dsh is the command-line launcher for DeepSeek Harness (DSH), published on npm as @deepseek-ai/dsh. It loads the selected profile and forwards remaining arguments to the launched application, and it is the only supported way to start a Node application.— dsh CLI README
- profile
- A profile is how DeepSeek Harness stacks several plugin bundles as ordered patch layers; web, headless, sdk and acp are built-in profiles. web is an alias for --profile web, and the composed config tree it produces decides which capabilities a run has.— dsh CLI README
- DSH Plugin Hub
- DSH Plugin Hub is the community-official plugin market installed into your DSH environment. It offers browsing, one-click install, uninstall and updates, and shows a confirmation dialog with the plugin source and the exact command before installing — a one-stop UI for managing DSH plugins.— dshplugin/dsh-plugin-hub GitHub repository
- $DSH_HOME
- $DSH_HOME is the DeepSeek Harness user data directory, ~/.dsh by default, holding profiles, configuration and session data. The program package itself lives in the npm cache or a global directory, separate from this data directory.— dsh CLI README
Sources
- deepseek-ai/deepseek-harness· GitHub
- DeepSeek Harness Docs - Quickstart· deepseek-harness
- dsh CLI README· deepseek-ai
- dshplugin/dsh-plugin-hub· GitHub