DeepSeek Harness Web UI: DSH plugin tasks and approvals
After the DeepSeek Harness Web UI opens, follow four steps: set the model key under Settings → Models, add and select a workspace, then start a session and send tasks — approval-required actions prompt you first. For launching and ports, see Use dsh web: Web UI at 127.0.0.1:3080; this guide focuses on what to do after it opens: configuring models, choosing a workspace, sending tasks and approvals, and how to continue afterward.
First step after opening the DeepSeek Harness Web UI: configure the model
The first thing is to configure the model: open Settings → Models, enter your DeepSeek API key and save; the model route becomes available immediately, with no server restart (source). Walk through it:
- Open the settings menu — click Settings and switch to Models. Expected: you see the DeepSeek card plus an "add a model provider" entry below it.
- Enter the API key — paste your DeepSeek API key into the DeepSeek card and save. Expected: saving succeeds without asking you to restart.
- Verify with one request — send a task right away. Expected: a normal response means the model is wired up; changes apply on the next request.
- Add other providers — for other models or a custom OpenAI-compatible endpoint, follow the model guide. Expected:
providersand credentials are configured separately, as in Configure DeepSeek Harness model providers.
Configuring a model only affects later requests; it does not reset workspaces or session data.
Why the DeepSeek Harness Web UI requires selecting a workspace
Because a brand-new Web UI selects no workspace, and the session input box stays disabled until you add and select one (source). The dsh process uses the launch directory as its default file-system location, but the UI still needs an explicit choice:
- Click Select Workspace — find the Select Workspace control. Expected: a directory picker appears.
- Add the launch directory — add the project directory where you started
dsh. Expected: the directory shows up in the candidate list. - Select it — pick that directory. Expected: the session input becomes usable, and the agent can only read and write the workspace you chose.
Think of the workspace as "this task's territory": without it, the agent does not know which project to touch. For isolation across projects, see Choose a DeepSeek Harness workspace.
DeepSeek Harness Web UI sessions: tasks, approvals, and what the agent does
Once a workspace is selected you can start a session and send a task; the agent reads and edits workspace files, runs commands, delegates work, and maintains a plan — actions requiring approval under the current policy are prompted first (source). Session basics:
- Send the first task — start a session and describe the goal in natural language (for example, summarize the repository and identify its main packages). Expected: the agent reads files first, then concludes, rather than editing blindly.
- Watch for approval prompts — when a step needs approval, the UI pauses and asks. Expected: it continues only after you approve; declining skips that step. Permission presets are covered in Set DeepSeek Harness permission presets.
- See delegation and planning — for complex work, the agent delegates sub-work and maintains a plan list. Expected: progress is visible in the session.
- Open several sessions on one project — for parallel, independent work, start multiple sessions in the same workspace. Expected: each session records independently.
If a task gets no response, suspect two things first: no workspace selected or no model key configured — recheck the previous two sections.
How to continue after the DeepSeek Harness Web UI: SDK, CLI, and plugins
The Web UI is only one entry point: afterward you can drive the same dsh profile from code with the Python SDK, run tasks in the terminal through other CLI modes, or develop plugins (source). Three paths:
- Python SDK — to call from your own program, see Call DeepSeek Harness from Python. Expected: the SDK lazily starts an internal
dsh --profileprocess and reuses it, with configuration composed from the profile and patches. - Other CLI modes — if you prefer the terminal, run tasks with the appropriate
dshprofile. Expected: it shares the same plugin and configuration system as the Web UI. - Develop or install plugins — to extend the Web UI, install DSH Plugin Hub first, then browse, search, and one-click install community plugins under Settings → Plugin Market. Expected: interface plugins take effect after a page refresh.
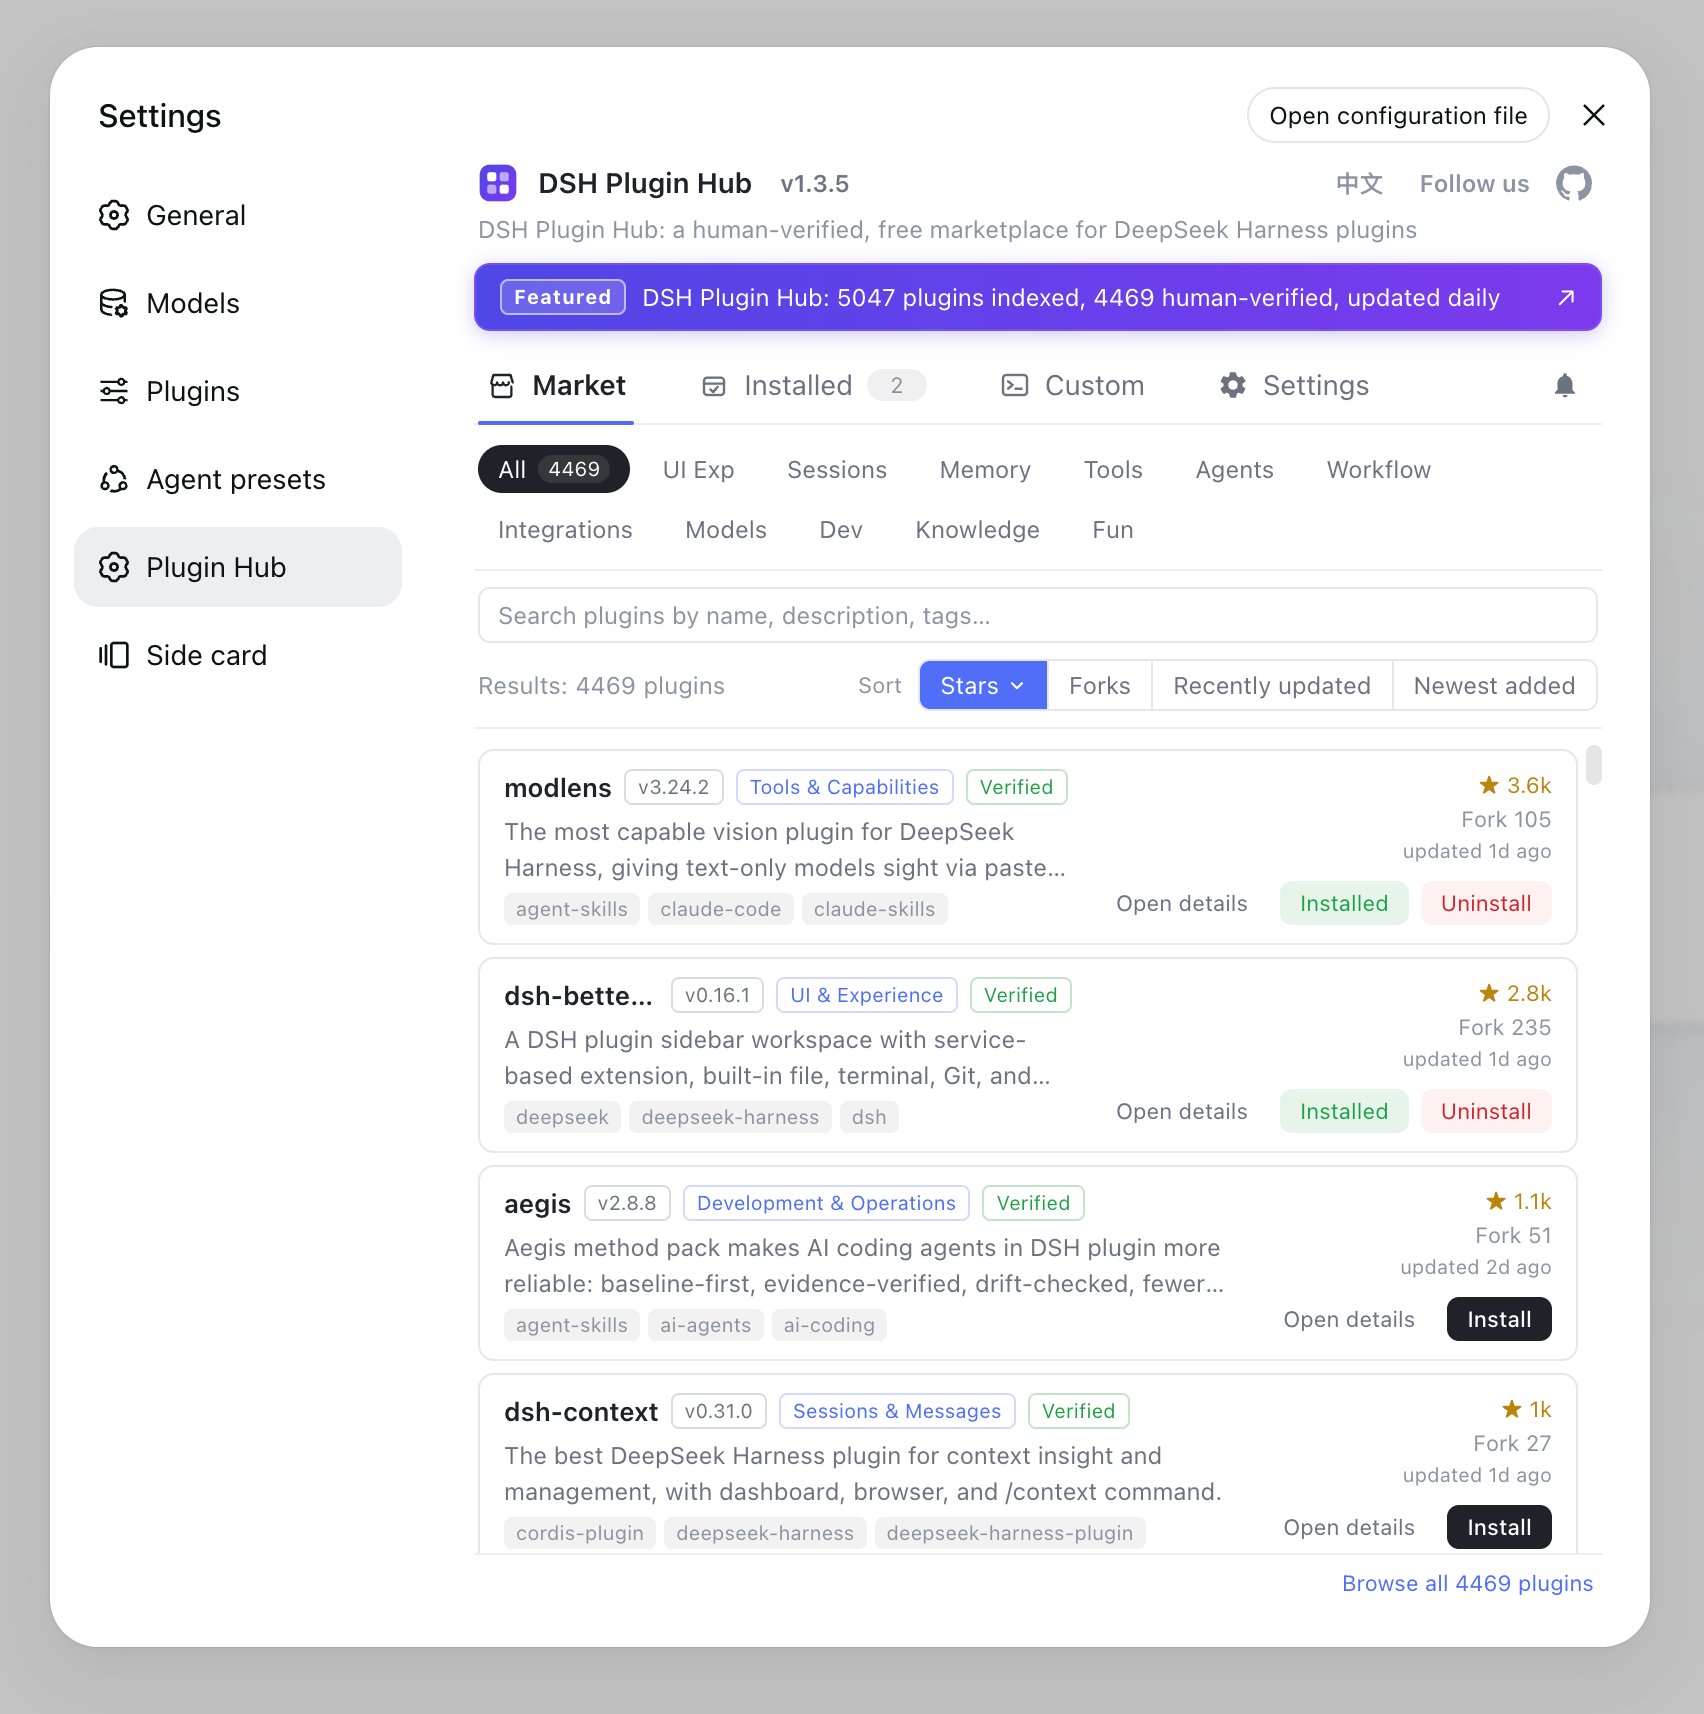
If an installed plugin does not take effect, it is usually a missed refresh or the wrong profile; see What to do when a DSH plugin does not load.
Notes and common questions
- Do not stop at "configured": without a workspace the input stays disabled; without a model key, sent tasks return nothing.
- Approval is not a failure: the prompt is the permission policy at work; adjust the preset to reduce interruptions.
- Keys are sensitive: the API key lives in a credentials file; do not screenshot it or commit it.
- Will not open or shows a blank page: that is a launch-and-access issue, covered in Troubleshoot a blank DeepSeek Harness Web UI.
Sources: Use the Web UI (official docs), Configure models (official docs)
FAQ
After opening the DeepSeek Harness Web UI, first go to Settings → Models, enter your DeepSeek API key and save; the model route takes effect immediately without restarting the server. Then add and select a workspace, which enables the session input box.
The DeepSeek Harness Web UI never auto-selects a workspace: the dsh process uses its launch directory as the default file-system location, but until you click Select Workspace, add a project directory, and select it, the session input box stays disabled.
In the DeepSeek Harness Web UI, once a workspace is selected the agent can read and edit workspace files, run commands, delegate work, and maintain a plan. If an action requires approval under the current permission policy, the Web UI asks you first.
After the DeepSeek Harness Web UI you have three paths: drive the same dsh profile from code with the Python SDK, run tasks in the terminal through other CLI modes, or develop plugins. To install plugins, browse community ones on DSH Plugin Hub.
In DeepSeek Harness the Web UI workspace and the CLI launch directory are related but not identical: the dsh process treats the launch directory as its default file-system location, while the Web UI asks you to add and select a workspace explicitly; only then can the agent read and write that directory.
Related Terms
- Web UI
- The Web UI is the browser interface of DeepSeek Harness, served by the dsh web app, for configuring models, selecting workspaces, sending tasks, and managing plugins.— DeepSeek Harness Documentation - Use the Web UI
- workspace
- A workspace is the file-system location the agent reads and writes in the Web UI. A new interface selects none automatically; you must add and select one, because the session input stays disabled until then.— DeepSeek Harness Documentation - Use the Web UI
- approval
- Approval is the safety mechanism of DeepSeek Harness: when an action requires user confirmation under the current permission policy, the Web UI prompts first and the agent proceeds only after you approve.— DeepSeek Harness Documentation - Use the Web UI
- session
- A session is the conversation unit that carries one task in DeepSeek Harness. After selecting a workspace you can start sessions from the Web UI; one workspace may host several independent sessions.— DeepSeek Harness Documentation - Use the Web UI
Sources
- DeepSeek Harness Documentation - Use the Web UI· deepseek-harness
- DeepSeek Harness Documentation - Configure models· deepseek-harness