Use dsh web: DeepSeek Harness Web UI at 127.0.0.1:3080
dsh web opens the DeepSeek Harness Web UI at http://127.0.0.1:3080 by default; the UI splits into session, settings, and plugin market areas. Follow the four-step flow "launch → configure the model key → select a workspace → send tasks": approval-required actions are prompted in the UI, and plugins install with one click from Settings → Plugin Market. This guide covers the layout, the four-step flow, and common settings.
Overview: four steps to get started
Using the DeepSeek Harness Web UI boils down to four steps: launch and access it, configure the model, select a workspace, then send tasks. dsh web is the launch method used by the official Quickstart, and the command prints the access address (source). This article walks through the four steps, then covers the UI areas, common settings, and installing interface plugins from the plugin market.
- Launch and access: run
npx @deepseek-ai/dsh weband open the address the terminal prints; - Configure the model: enter the API key under Settings → Models and save;
- Select a workspace: click Select Workspace, add and select the project directory;
- Send tasks: start a session and send your first task — approval-required actions prompt first.
Each step is unpacked below.
Step 1: launch and access dsh web at 127.0.0.1:3080
After launching dsh web the terminal prints the access address; the default is http://127.0.0.1:3080. Start it in one shot with npx:
npx @deepseek-ai/dsh web
After startup, the terminal prints the Web UI address to open in your browser (source). The default is http://127.0.0.1:3080; if the port is occupied, use dsh --profile web --port 8080, where --port belongs to the web app and follows the profile. If it won't open, follow DeepSeek Harness Web UI not opening or blank.
Step 2: configure the model under Settings → Models
Open Settings → Models, enter your DeepSeek API key and save — the model route becomes available immediately without restarting the server. Key points:
- Enter the API key: paste the DeepSeek API key under Settings → Models and save (source).
- No restart needed: once saved, the model route works right away — no need to restart dsh web.
- Other models: to connect a local model or other providers, see Connecting a local model to DeepSeek Harness.
Step 3: select a workspace
Click Select Workspace, add the project directory where dsh was launched, and select it — the session input stays disabled until a workspace is selected. The dsh process uses the calling directory as the default file-system location, but a new Web UI does not select any workspace until one is added (source). In detail:
- Click the Select Workspace button in the UI;
- In the directory picker, add the project directory where dsh was launched;
- Select it — the session input becomes usable immediately, and the agent can read and write files under this directory.
Step 4: send tasks and approvals
Once the model and workspace are set, start a session and send a task; approval-required actions are prompted in the Web UI first. The agent can read and edit workspace files, run commands, delegate work and maintain a plan (source); for sensitive operations the Web UI asks for your consent before executing, and only continues after you approve.
Web UI areas: sessions, settings, plugin market
The interface has three core areas: the session area runs tasks, the settings area configures models and the workspace, and the plugin market manages DSH plugins. In detail:
- Session area: the session input is only enabled after you select a workspace; once you send a task, the agent can read and write files in the workspace, run commands, delegate work, and maintain a plan — and the Web UI asks you first for any action requiring approval (source).
- Settings area: models, workspace, and plugin market all live here; model keys and endpoints, plus workspace directories, are added and removed from this area.
- Plugin market: once DSH Plugin Hub is installed it appears in settings, letting you browse, search, and one-click install, upgrade, or uninstall plugins right inside the app.
Common settings: port, model, and workspace
Three high-frequency settings: the port is passed on the command line, while the model key and workspace are configured in the UI. Key points:
- API key: open Settings → Models, enter your DeepSeek API key, and save — the model route works immediately without a restart (source); to connect a local model or other providers, see Connecting a local model to DeepSeek Harness.
- Workspace: click Select Workspace, add the project directory where dsh was launched, and select it; the dsh process uses the calling directory as the default file-system location.
- Port: specify it on the command line with
dsh --profile web --port <port>; changing the port does not affect session data.
Enhancing the Web UI from the plugin market: interface DSH plugins
The most convenient way to install plugins is Settings → Plugin Market: install DSH Plugin Hub first, then browse, search and one-click install plugins without leaving the app. Under DeepSeek Harness's "everything is a plugin" architecture, interfaces are plugins too (source): for example, dsh-better-sidebar provides file/terminal/Git sidebars and dsh-balance-widget shows your quota at a glance. Once the Hub is installed, opening Settings → Plugin Market lands you on the marketplace home, where you browse by category and install with one click:
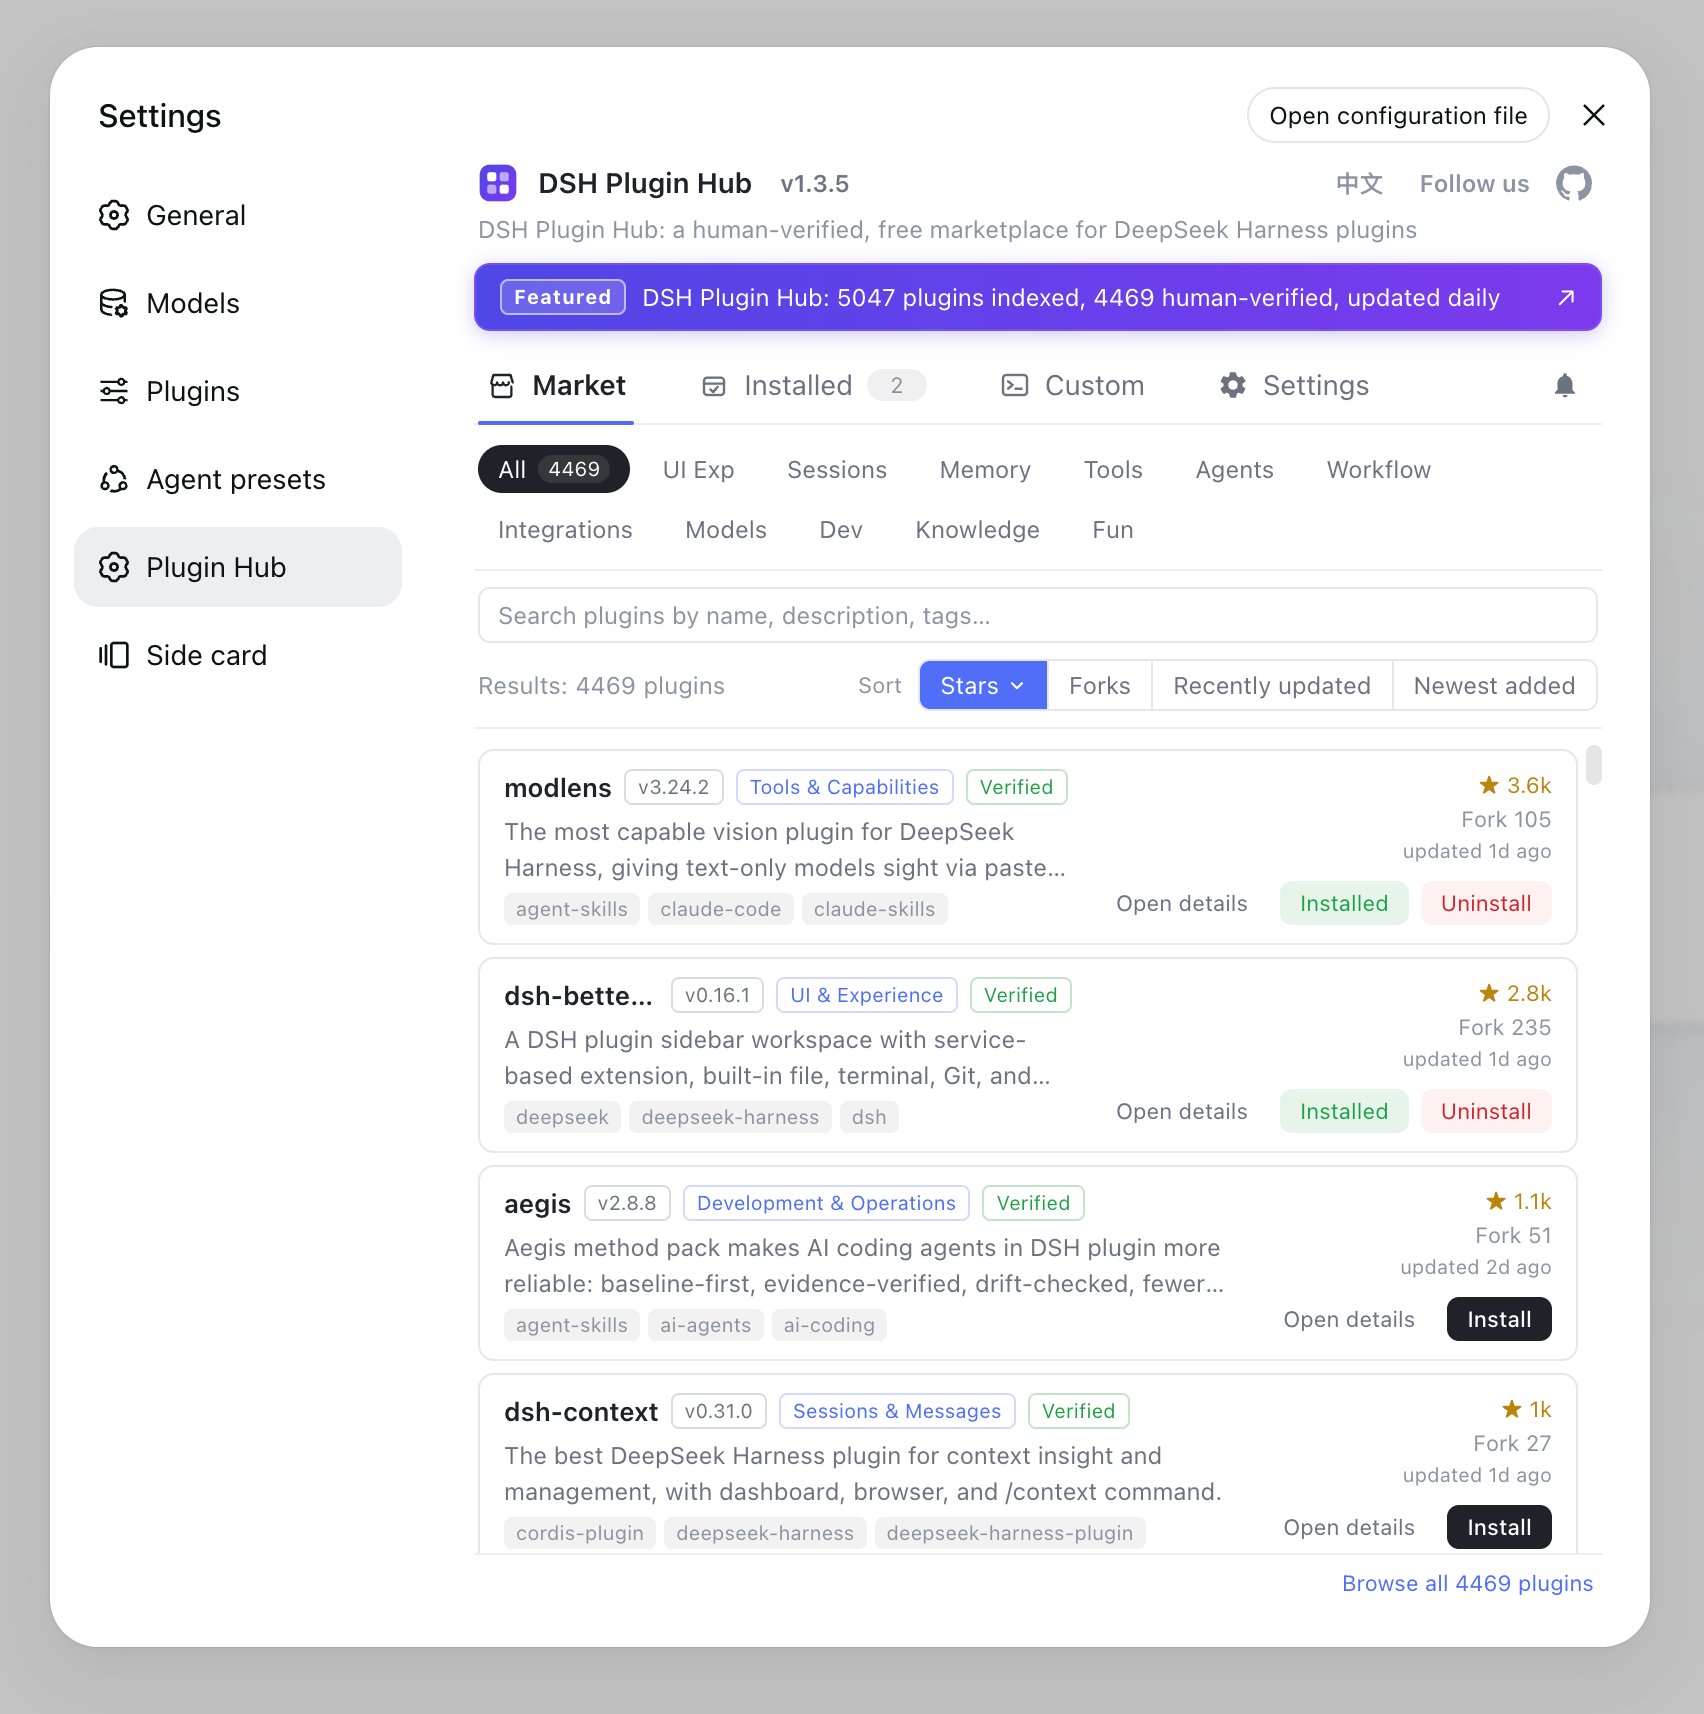
Interface plugins take effect on refresh. See Top DSH plugins worth installing for popular picks, and How to use DSH Plugin Hub for installing and removing them.
Common issues and next steps
- The browser will not open it: confirm the port is free and the firewall allows it — follow DeepSeek Harness Web UI not opening or blank.
- Messages get no response: usually a missing workspace selection or model key — re-check Steps 2 and 3.
- Installed plugins have no effect: usually a missing page refresh or a wrong profile — see DSH plugins not loading.
Sources: DeepSeek Harness official website, Official Quickstart, dsh CLI README
FAQ
After launching dsh web, the terminal prints the access address; by default it is http://127.0.0.1:3080. If the port is occupied, switch with dsh --profile web --port 8080.
Three core areas: the session area (send tasks after selecting a workspace; approval-required actions prompt first), the settings area (models, workspace, plugin market), and the plugin market (install and manage DSH plugins). Model keys are configured under Settings → Models, plugins under Settings → Plugin Market.
Open Settings → Models, enter your DeepSeek API key and save; the model route becomes available immediately without restarting the server. Other providers and custom OpenAI-compatible endpoints are covered in the official model configuration guide.
The dsh process uses the calling directory as the default file-system location, but a new Web UI does not select any workspace until one is added. The session input stays disabled until you click Select Workspace, add a project directory, and select it.
After installing DSH Plugin Hub, Settings → Plugin Market lets you browse, search, and one-click install 10000+ community plugins; you can also copy dsh plugin --profile web add <package> into a terminal.
Sources
- DeepSeek Harness official website· DeepSeek
- DeepSeek Harness Documentation - Quickstart· deepseek-harness
- dsh CLI README· deepseek-ai