Uninstall DeepSeek Harness on Windows, macOS, and Linux
The hard part of uninstalling DeepSeek Harness is never the command; it is knowing which paths to delete and which to keep. Commands differ little across platforms, but paths differ a lot: the program lives in the global npm directory, the cache in npm's cache directory, and your configuration and sessions in the data directory $DSH_HOME (default ~/.dsh). This article lists all three tiers for Windows, macOS, and Linux, with a way to verify each.
How to uninstall DeepSeek Harness: program, cache, data
Uninstalling DeepSeek Harness starts with three tiers, and only then do platform differences matter, because each tier is a different path with a very different cost of getting it wrong (source).
| Tier | What it holds | How to handle it | How to verify |
|---|---|---|---|
| Program | Globally installed package, source checkout | Remove according to how you installed it | dsh --version reports no such command |
| Cache | npx downloads, pnpm store | Keep or clear, it does not affect function | npm config get cache shows whether it is empty |
| Data | $DSH_HOME, default ~/.dsh | Keep to reinstall, delete only to say goodbye | Whether the folder is still there |
The order in which to decide:
- Identify how the program was installed. The no-install npx path has no global files, a global install needs the uninstall command, and a source build just deletes the repository directory. Expected: getting this right clears the program tier in one step; getting it wrong leaves something that still runs.
- Decide about the cache. The cache is only a downloaded copy. Expected: keeping it changes nothing but disk usage, so clear it only if you want a spotless machine.
- Decide about the data. The data directory holds profiles, configuration, and sessions. Expected: keep it and a reinstall restores everything; delete it and you have reset the environment.
The full method-by-method comparison is in how to uninstall DeepSeek Harness.
Uninstall DeepSeek Harness on Windows: global directory, PATH, data
Uninstalling DeepSeek Harness on Windows takes four steps: stop the process, remove the program, clear the cache, settle the data (source).
- Stop the running process first. Close every dsh window and, if needed, end leftover Node processes in Task Manager. Expected:
netstat -ano | findstr :3080prints nothing, so the port is free. - Remove the program. If you installed globally, run
npm uninstall -g @deepseek-ai/dsh. Expected: thedshcommand stops working. - Check the global directory and command shims. Run
npm root -gfor the real global node_modules path, typically%APPDATA%\npm\node_moduleson Windows, while the command shims sit alongside in%APPDATA%\npm. Expected: the package directory is gone and the shims disappear with it. - Clear the cache. Get the cache directory with
npm config get cacheand delete its_npxsubfolder. Expected: the no-install downloads are removed without touching other Node projects. - Settle the data. The data directory is
%USERPROFILE%\\.dsh. Expected: keep it for a future reinstall, or delete the whole folder for a clean break, after a backup.
Uninstall DeepSeek Harness on macOS: global node_modules, Finder
On macOS the trick is to get the real path from a command first, then confirm it in Finder (source).
- Stop the process and confirm the port. Close dsh in your terminal and run
lsof -i :3080. Expected: no output means the server has stopped. - Remove the program. Run
npm uninstall -g @deepseek-ai/dsh. Expected: the command is no longer available. - Get the global node_modules path. Run
npm root -g. Expected: the path depends on how Node was installed, so it may be a system directory or inside an nvm version folder; never copy a fixed path from an article. - Confirm leftovers in Finder. Press
Cmd+Shift+G, paste the path, and press return. Expected: you see immediately whether the package folder is still there, which beats cd-ing through directories in a terminal. - Settle the data. The data directory is
~/.dsh, that is/Users/<your-name>/.dsh. Expected: it is not a system app cache, so decide about sessions before deleting it.
Uninstall DeepSeek Harness on Linux: permissions and autostart
On Linux, uninstalling DeepSeek Harness most often stalls on permissions and autostart leftovers (source).
- Decide whether you need sudo. If Node came from a system package, the global node_modules belongs to root. Expected: without
sudoyou get a permission error, which is a privilege problem rather than a broken package; see uninstall failed for the treatment. - Remove the program. Run
npm uninstall -g @deepseek-ai/dsh, withsudoif the previous step says so. Expected: the command is no longer available. - Check the global directory. Run
npm root -gand confirm the path, commonly under a systemnode_modules, or inside your home directory when Node came from nvm. Expected: nvm users need neither sudo nor system directories. - Check autostart and background processes. If you wrote a systemd unit or a background launch script yourself, stop and remove it too. Expected:
pgrep -af dshreturns no process, so nothing keeps holding port 3080 after the uninstall. - Settle the data. The data directory is
/home/<your-name>/.dsh. Expected: back it up before deleting, especially when you want to keep session data.
DSH plugins and leftovers: confirming clean, keeping for reinstall
Confirming a clean uninstall means checking three layers: program, port, and data (source).
- Program layer. Run
dsh --versionand inspectnpm ls -g --depth=0. Expected: the first reports no such command and the second no longer lists@deepseek-ai/dsh. - Port layer. Check whether 3080 is still listening (
lsof -i :3080on macOS and Linux,netstat -ano | findstr :3080on Windows). Expected: empty output is clean; anything else means a process is still alive. - Data layer. Confirm the state of
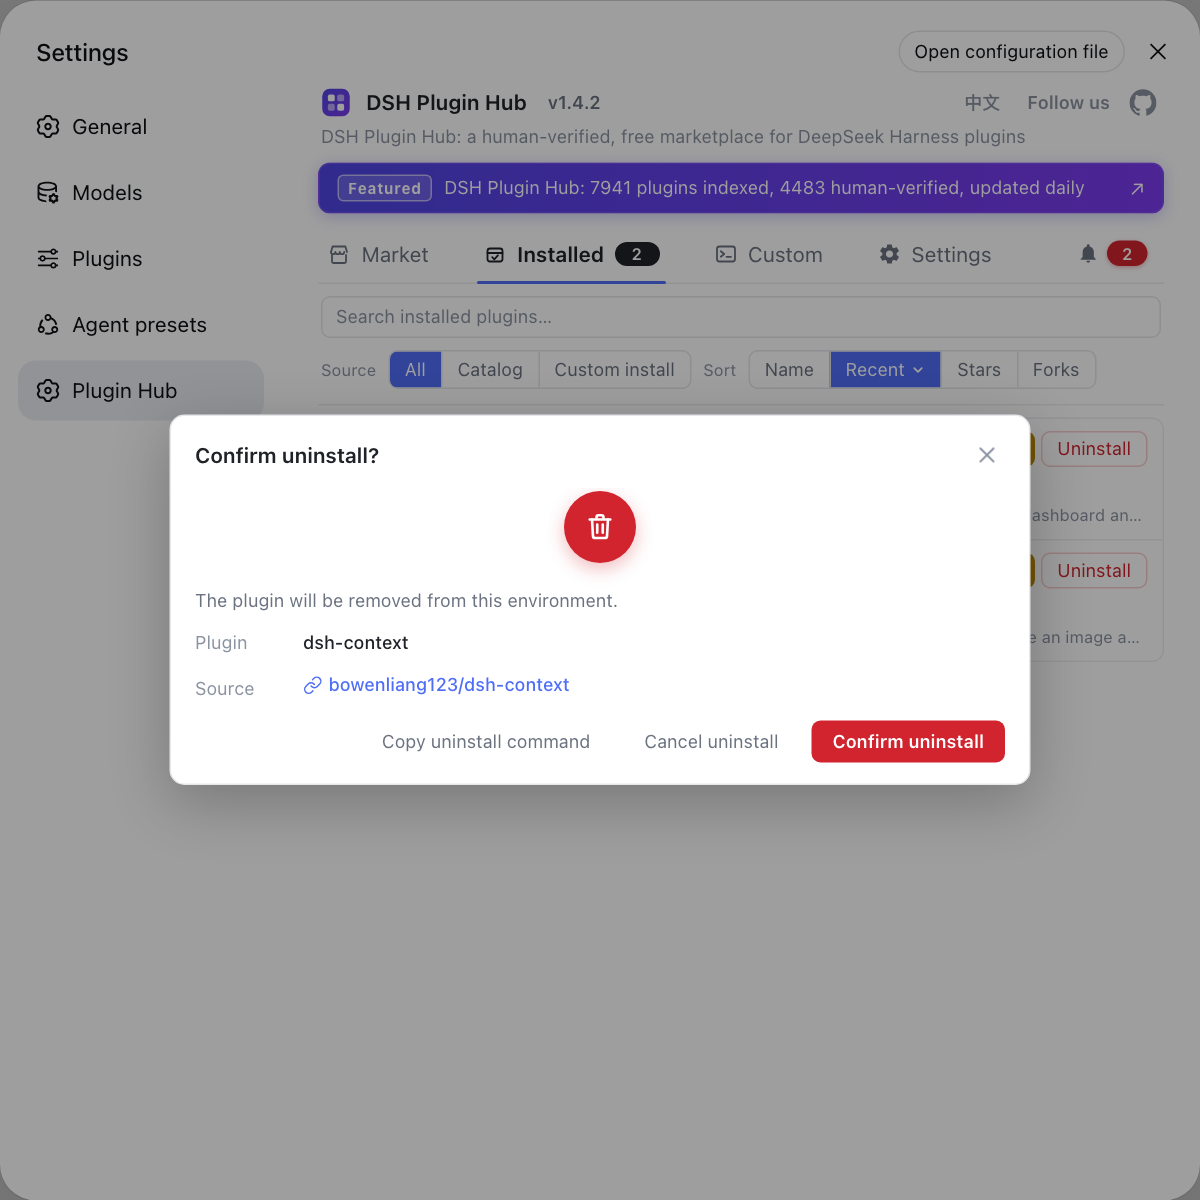
$DSH_HOMEmatches what you intended. Expected: for a reinstall you should still see it, and for a clean break you should see it gone. - Never hand-delete DSH plugin files. To remove only some DSH plugins, use the uninstall action in the installed list. Expected: Hub shows a confirmation dialog naming the plugin and its source repository, and removes nothing until you confirm, which guards against deleting a plugin you still want.
- Keep the data if you plan to reinstall. Leave the data directory alone while removing the program. Expected: configuration, sessions, and plugin records return intact after reinstalling; see uninstall, reinstall, and data migration.
Caveats and limits of uninstalling DeepSeek Harness by platform
- Same command, different paths.
npm uninstall -gworks the same on all three platforms, but leftovers move with how Node was installed, so always querynpm root -glive. - The data directory is out of scope. No uninstall command touches
$DSH_HOME; deciding its fate is on you, and a backup comes first. - Permission errors are not failed uninstalls. An
EACCESon Linux usually just means you need sudo or an nvm-managed Node, not a Node reinstall. - Autostart leftovers are the easiest to miss. A service or background script you configured by hand does not vanish with the package and keeps holding the port, which confuses later upgrades and reinstalls.
- Where a full clean ends. Deleting all three tiers is a complete clean, while deleting only the program is a routine uninstall; for leftover cleanup see how to clear leftovers.
To remove DSH plugins rather than all of DSH, use the installed list in DSH Plugin Hub, where source tags let you clear only the manually installed ones.
Sources: DeepSeek Harness README (official repository), dsh CLI README (official repository), npm uninstall docs
FAQ
Uninstalling DeepSeek Harness on Windows has three tiers: run npm uninstall -g @deepseek-ai/dsh if you installed globally, use npm root -g to find the global directory and check for leftovers, then clear the cache and the data directory %USERPROFILE%\.dsh as you prefer. Back up the data directory first or sessions and configuration disappear with it.
On macOS, uninstall DeepSeek Harness with npm uninstall -g @deepseek-ai/dsh, then use npm root -g to get the real global node_modules path and check it for leftovers. In Finder, press Cmd+Shift+G and paste the path to jump straight there. The data directory is ~/.dsh, which is not an app cache, so its fate is your call.
A permission error when uninstalling DeepSeek Harness on Linux usually means the global node_modules belongs to root, so prefix the command with sudo to run npm uninstall -g @deepseek-ai/dsh. If Node came from nvm, the global directory sits inside your own home directory and no sudo is needed.
Confirming a complete DeepSeek Harness uninstall takes three layers: the program layer, where dsh --version reports no such command and npm ls -g --depth=0 no longer lists it; the port layer, where nothing listens on 3080; and the data layer, where $DSH_HOME matches your intent. All three aligned means clean.
If you plan to reinstall DeepSeek Harness, keep the data directory, which defaults to ~/.dsh, because configuration, sessions, and DSH plugin records all live there. As long as it survives, a reinstall restores everything, and moving to a new machine is just a copy of that folder.
Related Terms
- global node_modules
- The global node_modules is the directory where npm stores globally installed packages, used when uninstalling DeepSeek Harness to locate program leftovers. Its real path varies with how Node was installed, so query it live with `npm root -g` instead of copying a path from elsewhere.— npm docs
- %USERPROFILE%\.dsh
- %USERPROFILE%\.dsh is the default DeepSeek Harness data directory on Windows, the equivalent of ~/.dsh on other platforms, holding profiles, configuration, and sessions. Removing the program never touches it; only a full reset deletes it, and that should be preceded by a backup.— dsh CLI README
- npx cache
- The npx cache is the directory where npx stores packages it downloads for no-install runs, which is where DeepSeek Harness content lands when you run it via npx. Its location follows npm's cache configuration and can be queried with `npm config get cache`; deleting it removes no installed program.— npm docs
- leftover path checklist
- A leftover path checklist is a per-platform list that splits an uninstall into the program, cache, and data tiers and names the path for each. It answers the problem of a command finishing while files remain on disk, since uninstall commands only handle the program tier while cache and data are separate decisions.— DeepSeek Harness README (official repository)
Sources
- DeepSeek Harness README (official repository)· deepseek-ai
- dsh CLI README· deepseek-ai
- npm docs - npm uninstall· npm