Manage installed DSH plugins in DeepSeek Harness
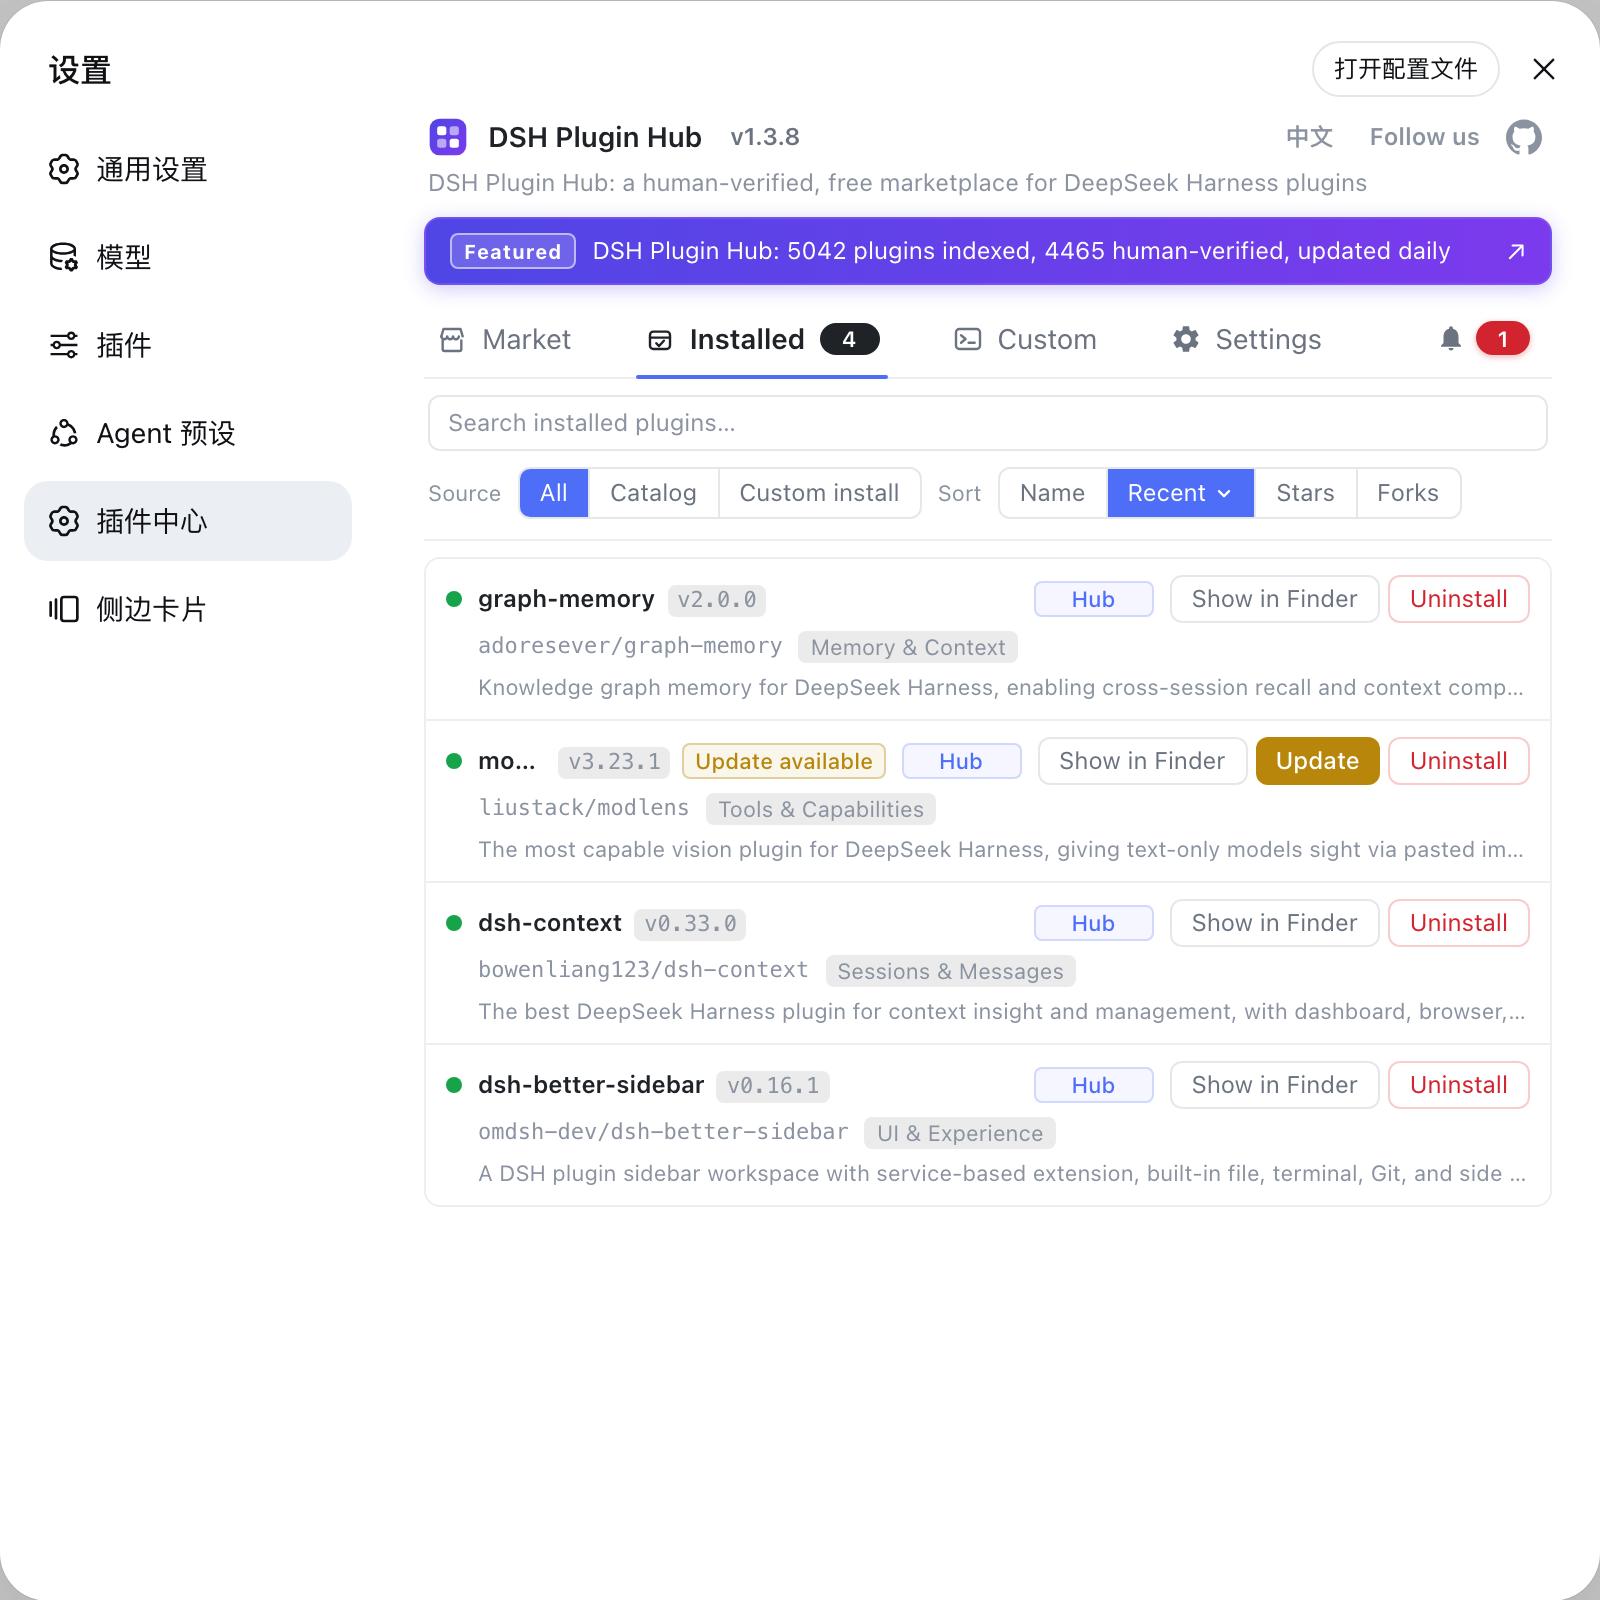
Plugin management in DeepSeek Harness lives in one place, the installed plugin list: open Settings → Plugin Center → Installed, where each row shows the plugin name, a source tag (catalog / manual install), version and update time, with search, source filter and sorting on top, and Update, Uninstall and Reveal in Finder at the row tail — every installed DSH plugin is managed here. The command line dsh plugin --profile web list sees the same list; this guide breaks down viewing, updating, uninstalling and locating plugin directories step by step.
Overview: five management tasks in one table
Installed plugins are not scattered around; they are collected into a single management entry, the installed plugin list. This is a feature of DSH Plugin Hub inside the Plugin Center (source):
| Task | UI way | Command-line way | Notes |
|---|---|---|---|
| View installed | the Installed list | dsh plugin --profile web list | UI is more visual; CLI is scriptable |
| Search & filter | search box + source filter + sort | n/a (fine while the list is small) | the three conditions stack |
| Update a plugin | Update button at the row tail | re-run add <package> to overwrite | catalog plugins flag new versions automatically |
| Uninstall a plugin | Uninstall button at the row tail | dsh plugin --profile web remove <package> | both remove dependencies only, keep data |
| Locate the directory | Reveal in Finder | look under $DSH_HOME | handy for manual cleanup |
Viewing installed plugins: two ways
To confirm what is installed and which version, the UI and the command line both work — they read the same data. Two ways:
Way 1: the Installed list in the UI (recommended daily)
The entry is the Installed page inside the Plugin Center; each row is the full information and action area for one plugin. Steps:
- Open the DeepSeek Harness Web UI and go to Settings;
- Click Plugin Center (the entry appears once DSH Plugin Hub is installed);
- Click Installed in the top navigation to enter the installed plugin list;
- Read each row: plugin name, source tag, version number, update time, and the action buttons at the row tail.
The badge number in the top navigation equals the total count of installed plugins, so you can confirm at a glance whether anything has been installed.
Way 2: the command line
Without opening the UI, one command lists every installed plugin. Prerequisite: dsh has been started at least once (the web profile is initialized). Steps:
# List plugins installed in the web environment
dsh plugin --profile web list
The output lists plugin names and versions. Fallback: on command not found, prefix with npx @deepseek-ai/dsh; on a missing-argument error, add --profile web.
Searching and filtering: three tools that stack
Once the list grows, the three tools at the list header locate a plugin quickly: the search box, the source filter and the sort button group. How to use them:
- Search: type a plugin name or keyword and the list filters in real time;
- Source filter: All / Catalog / Custom install splits plugins by origin (catalog = installed from the market, custom = installed via NPM / GitHub / a command);
- Sort: Name / Recent / Star / Fork buttons; clicking the same button toggles between ascending and descending order; use Recent to surface the newest installs first.
The three conditions stack, so even with dozens of plugins you can pin down a target in seconds.
Updating plugins: two ways
Catalog plugins automatically show an Update button when a new version exists; manually installed plugins need you to watch for versions yourself. Two ways:
Way 1: click Update in the UI
An Update button at the row tail means a new version is available — click and confirm to reinstall the latest. Steps:
- Open the installed list and find the target plugin;
- Click the Update button at the row tail;
- Review the plugin and its source in the confirmation dialog, then confirm;
- Wait for the live progress to finish; the version number updates.
Fallback: no Update button means you are already up to date; on a failed update, read the failure dialog — reinstall the npm build if the package is incomplete, or clear the cache and retry.
Way 2: reinstall via the command line to overwrite
For scripts or batch scenarios, one add re-pulls the latest version and overwrites. Prerequisite: you know the package name. Steps:
# Reinstall to the latest version (same "install again = update" semantics as the market)
dsh plugin --profile web add <package>
Confirm the version changed with dsh plugin --profile web list. Fallback: a mistyped name returns 404 — verify with npm view <package> first.
Uninstalling and disabling: two ways
There is no separate "disable" switch in the current version: disabling a plugin means uninstalling it, and you can reinstall it whenever you need it again. Two uninstall ways:
Way 1: uninstall from the UI
Click the button, confirm, wait for the progress — done from the row. Steps:
- Open the installed list and find the target plugin;
- Click Uninstall at the row tail;
- Review the plugin and its source in the confirmation dialog, then confirm;
- Once the live progress finishes, the plugin disappears from the list.
Way 2: uninstall from the command line
# Uninstall by package name
dsh plugin --profile web remove <package>
If unsure about the package name, run dsh plugin --profile web list first. Both ways behave identically underneath: they only remove the dependency, leaving configs, credentials and sessions under $DSH_HOME untouched (source); fully cleaning leftover cache directories is a separate manual step.
Locating the plugin directory: two ways
When you want to inspect or clean up plugin files by hand, find the install directory first. Two ways:
Way 1: Reveal in Finder, one click
The button at the row tail opens the plugin's install directory directly in the system file manager. Steps:
- Open the installed list;
- Click Reveal in Finder at the target plugin's row tail;
- The file manager opens the directory for inspection or manual cleanup.
Way 2: look under $DSH_HOME
Without the UI, find plugin leftovers and dependencies in dsh's data directory. Steps:
- Confirm where
$DSH_HOMEpoints (by default a dsh data directory under your home folder); - Find the plugin's dependencies and caches under the matching environment directory;
- Before deleting anything manually, verify the directory belongs to the plugin to avoid removing another plugin's files.
Troubleshooting common issues
Look at the symptom first, then fix accordingly. Common issues:
| Issue | Likely cause | Fix |
|---|---|---|
| The installed list is empty | nothing installed, or wrong profile | re-check with dsh plugin --profile web list and verify --profile |
| A plugin is missing from the list | manually installed, or filtered out by source | switch the source filter back to All |
| No Update button | already latest, or manually installed | wait for the author for catalog plugins; re-run add yourself for manual ones |
| Update fails | network issue, incomplete package | read the failure dialog, switch the npm mirror, reinstall the npm build |
| Space still used after uninstall | only the dependency was removed | Reveal in Finder, then clean leftover directories manually |
list errors out | never started, missing argument | prefix with npx @deepseek-ai/dsh, add --profile web |
| Wrong plugin installed, want another version | version does not fit | uninstall, then reinstall, or switch to the GitHub source |
If you cannot pinpoint it, open Settings → System logs for the full error and follow the matching guide.
Quick recap
In short: the installed list manages what you already have, and the Plugin Center market finds what is new — update, uninstall and locate all live at the row tail. Four reminders:
- The source tag helps you judge: catalog plugins show an Update button automatically, while manual installs need you to track versions;
- Disabling equals uninstalling: there is no standalone disable switch — stop a plugin by uninstalling, reinstall when needed;
- Uninstalling does not delete data: both UI and CLI remove only dependencies; configs and sessions under
$DSH_HOMEstay; - File location is one click away: Reveal in Finder is the fastest way to inspect or back up a plugin directory — no need to dig into
node_modules.
Sources: dshplugin/dsh-plugin-hub, DeepSeek Harness docs - Packaging and installing plugins
FAQ
Install DSH Plugin Hub first, then open Settings → Plugin Center and click Installed in the top navigation. The top nav also shows a badge with the total count of installed plugins; the command line sees the same list via dsh plugin --profile web list.
Each row shows the plugin name, a source tag (catalog plugin or manual install), the version number and the last update time. The row tail holds the actions: an Update button when a new version exists, plus Uninstall and Reveal in Finder.
Yes. The list header has a search box, a source filter (All / Catalog / Custom install) and a sort button group (Name / Recent / Star / Fork). Clicking the same sort button toggles ascending and descending order.
For catalog plugins, an Update button at the row tail means a new version is available; click it and confirm to reinstall the latest version. Manually installed (custom install) plugins have no automatic button — reinstall with dsh plugin --profile web add <package> to overwrite, or watch the author's releases. See How to batch update DSH plugins for batch updates.
Both remove the plugin dependency from the profile. The UI path uses a button with live progress and a result dialog; the CLI path runs dsh plugin --profile web remove <package>. The UI is more convenient for daily management.
Sources
- dshplugin/dsh-plugin-hub GitHub repository· GitHub
- DeepSeek Harness docs - Packaging and installing plugins· deepseek-harness