How to use dsh web: open it, tour the UI, install plugins
dsh web is the DeepSeek Harness web UI: start the service and open http://127.0.0.1:3080 in the browser. This guide covers three ways to open it, a tour of the main areas (settings, chat, Plugin Center, logs), and the common workflows for configuring a model and installing plugins — closing with a troubleshooting table.
Overview: what dsh web is
dsh web is a locally running web app — no desktop client to install, just a browser. Once started, everything happens in one interface (source). The four core areas at a glance:
| Area | What it does | When to use it |
|---|---|---|
| Settings | model, provider and key config | first run, switching models |
| Chat window | talk to models, manage history | daily use |
| Plugin Center | browse, install, manage plugins | installing plugins |
| Logs and diagnostics | review activity, troubleshoot | when something fails |
Three ways to open dsh web
Start by command, keep the service running, or visit directly — pick whichever fits. Three ways:
Way 1: start with npx (no install)
- Prerequisite: Node.js on the machine;
node -vprints a version; - Open a terminal and run:
npx @deepseek-ai/dsh web
- The first run downloads the package and initializes the web profile; wait for the "service started" message;
- The browser opens
http://127.0.0.1:3080automatically; finish the first-time setup.
Way 2: start after a global install
- Prerequisite:
npm install -g @deepseek-ai/dshhas been run before; - Run
dsh webin the terminal; - The browser opens
http://127.0.0.1:3080.
Way 3: visit directly when the service is already running
- Prerequisite: the dsh web service is running in some terminal (started by either way);
- Type
http://127.0.0.1:3080in any browser address bar and press Enter.
Fallback: dsh: command not found means there is no global install — switch to Way 1. If the address won't open, confirm the terminal service is still running (closing the terminal window stops the service).
Tour of the main areas: settings, chat, Plugin Center, logs
Think of the interface as configure → use → extend → troubleshoot. Tour:
- Settings: configure model providers and API keys — the first stop on a fresh install; port and proxy options live here too;
- Chat window: talk to models and manage session history — the daily workspace;
- Plugin Center: appears after installing DSH Plugin Hub and restarting; browse, install, update and uninstall plugins from here;
- System logs and diagnostics: review install/update/uninstall trails and run diagnostics for troubleshooting.
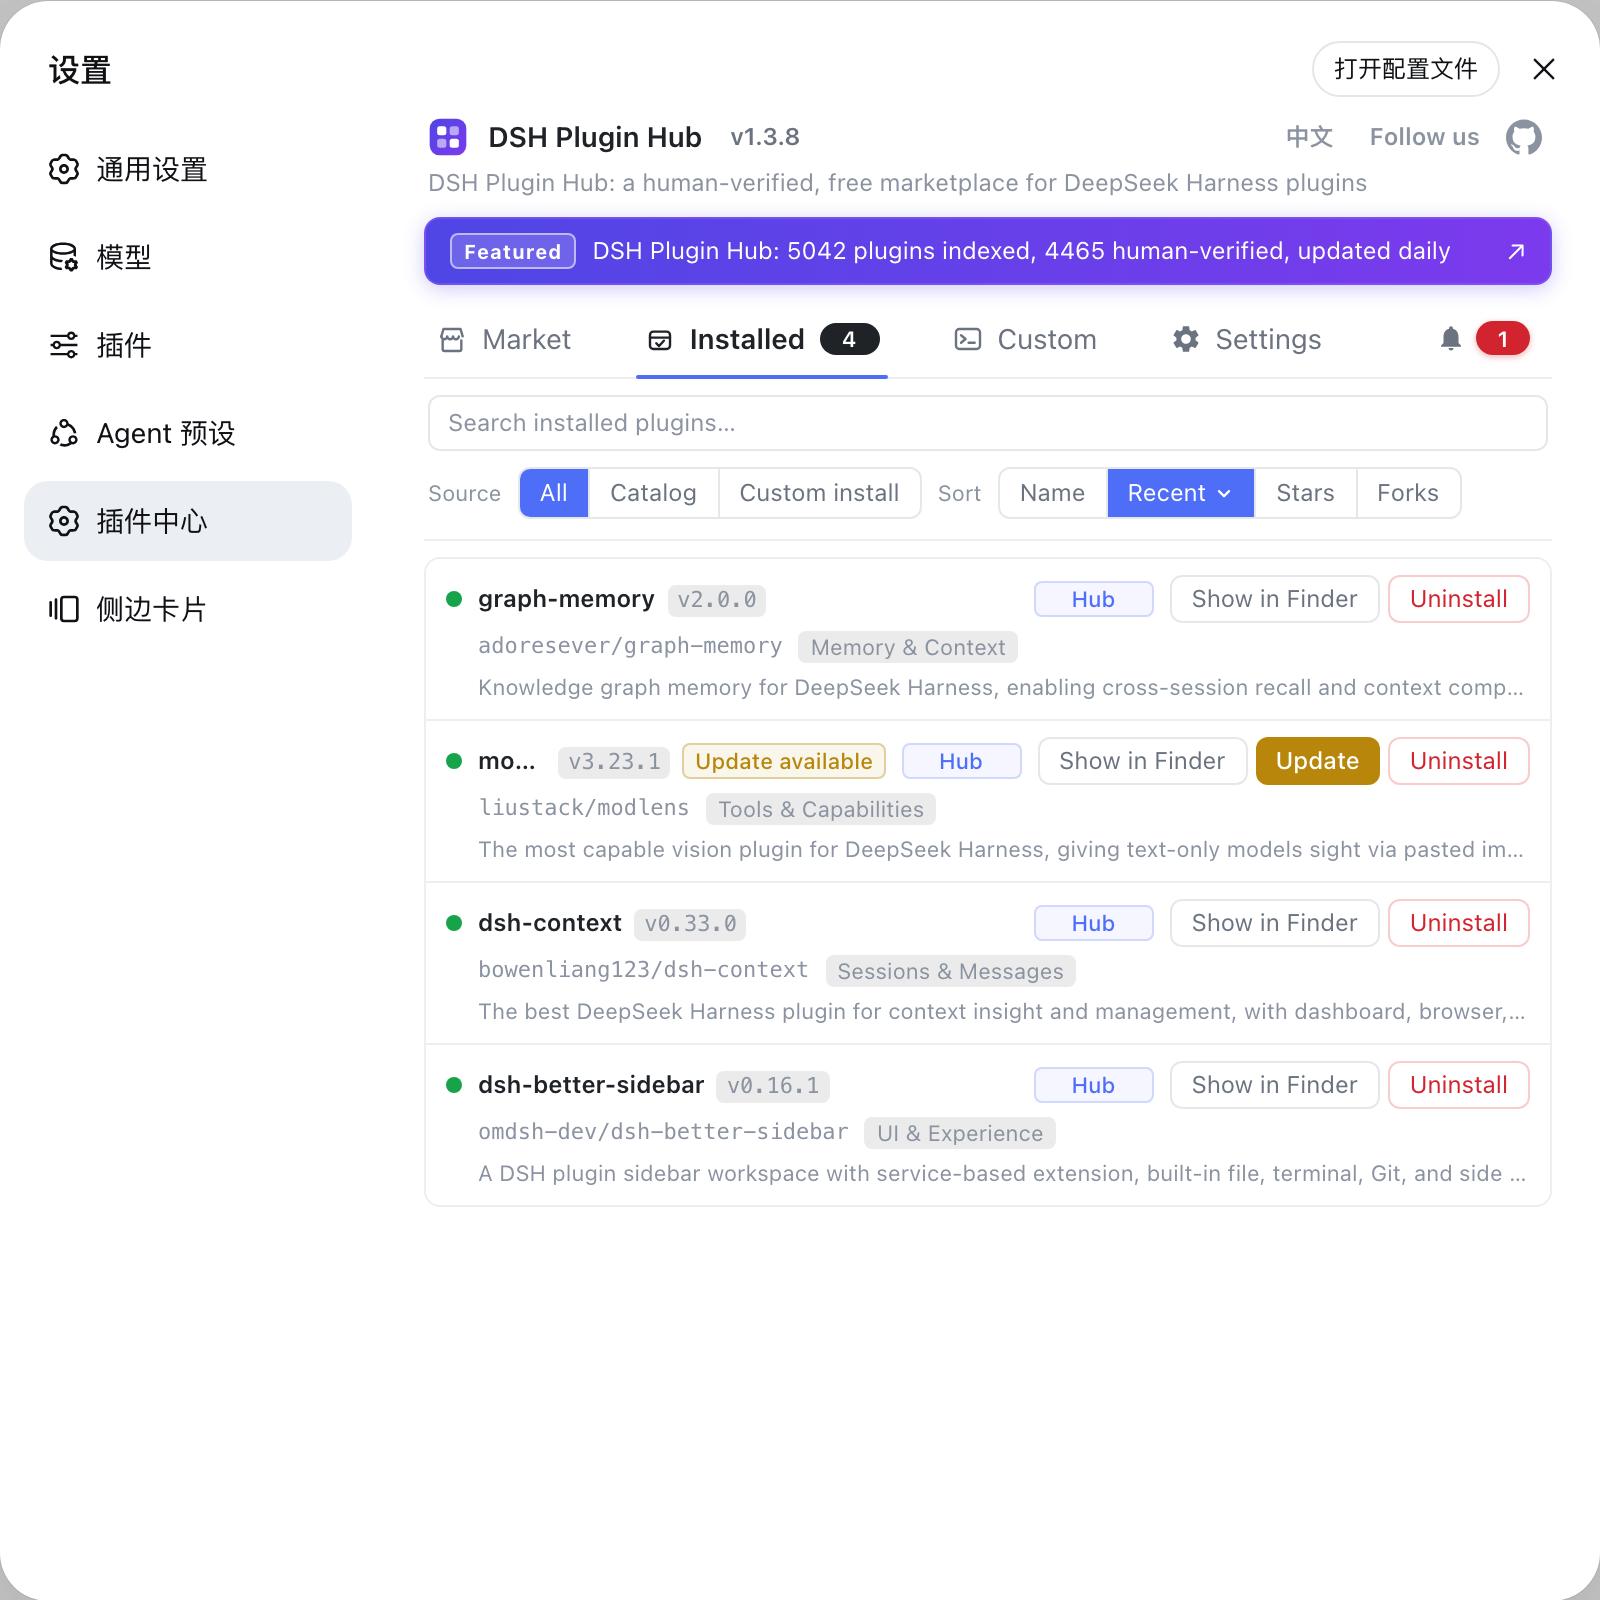
Common workflows: configure a model, install plugins, read logs
Three high-frequency operations, learned once. Steps:
Workflow 1: configure a model (change settings)
- Open Settings → model config;
- Choose a provider, fill in the endpoint and key (e.g. an OpenAI-compatible API);
- Click Save; the interface confirms;
- Return to the chat window, pick the model you just configured and start talking.
Workflow 2: install a plugin
- Add the market entry from the command line:
dsh plugin --profile web add dsh-plugin; - Restart dsh web and refresh the page;
- Open Settings → Plugin Center and search or browse to the target plugin;
- Click Install on its card, review the plugin name and source in the confirmation dialog, then confirm;
- When the live progress finishes, refresh the page — the plugin is active.
Workflow 3: read the logs
- Open Settings → System logs;
- Filter by category (install, update, uninstall, runtime) and level;
- Locate the relevant record and copy the full error text for troubleshooting.
Troubleshooting common issues
Can't open it, changes don't apply, errors thrown — locate the problem in the table first. Common issues:
| Issue | Likely cause | Fix |
|---|---|---|
| Port 3080 won't open in the browser | service not running or already exited | go back to the terminal and confirm the service is up; closing the window stops it |
dsh: command not found | no global install | use npx @deepseek-ai/dsh web, or run npm install -g @deepseek-ai/dsh first |
| Plugin Center missing from the UI | DSH Plugin Hub not installed, or not restarted | dsh plugin --profile web add dsh-plugin, then restart dsh web |
| Plugin not active after install | page not refreshed, or wrong profile | refresh the page; make sure the command used --profile web |
| Chat messages error out | model not configured, or wrong key | check the endpoint and key in Settings → model config, save, retry |
| Setting changes don't apply | not saved, or a restart is required | click Save; some settings only take effect after restarting dsh web |
Quick recap
In short: the web UI is the gateway — configure models in Settings, install plugins in the Plugin Center, check logs when something fails, and confirm the service is running if the page won't open. Four reminders:
- Configure a model first — without a provider configured, the chat window cannot work;
- Restart and refresh after installing plugins — restart dsh web and refresh after any install or uninstall to make sure it takes effect;
- Logs keep records — every install, update and uninstall is written to the system logs; read the logs first when something goes wrong;
- Keep the terminal open — the dsh web service runs in the terminal; closing the window stops it.
Sources: DeepSeek Harness docs - Quickstart, dsh CLI README, dshplugin/dsh-plugin-hub
FAQ
dsh web is the DeepSeek Harness web UI, a locally running web app. After the service starts, open http://127.0.0.1:3080 in the browser — it is the main interface for dsh, hosting settings, chats, the Plugin Center and logs in one place.
Three ways: run npx @deepseek-ai/dsh web without a global install; run dsh web after npm install -g @deepseek-ai/dsh; or, if the service is already running, type http://127.0.0.1:3080 in any browser. Keep the terminal window open — closing it stops the service.
Four core areas: Settings (model providers and API keys), the chat window (conversations and history), the Plugin Center (install and manage plugins, appears after installing DSH Plugin Hub and restarting), and system logs plus diagnostics for troubleshooting.
Open Settings → model config, pick a provider, fill in the endpoint and key (for example an OpenAI-compatible API), save, and the model becomes available in the chat window. Per-provider details are in the official docs.
First add the market entry from the command line with dsh plugin --profile web add dsh-plugin, restart dsh web, then go to Settings → Plugin Center → search → Install → confirm. Alternatively install any plugin directly with dsh plugin --profile web add <package>.
Sources
- DeepSeek Harness docs - Quickstart· deepseek-harness
- dsh CLI README· deepseek-ai
- dshplugin/dsh-plugin-hub GitHub repository· GitHub